

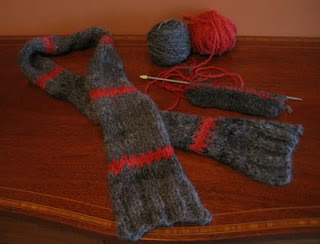
Makey-up fingerless mitts mainly on straight single-pointed needles and use DPN's for last bit (the thumbs)
-------------------------------------------------------------------------------------
Draw around hand – pencil on paper.
Mark out area to be covered by glove, including widening from wrist to base of thumb, length of base of thumb..
Measure in inches :
Width of wrist = WW
Length of wrist = LW
Width above wrist = WA
Top of wrist to thumb hole = WTH
Base of thumb hole = TH
Top of thumb hole to tip of glove = THT
If you want and end rib across the fingers, measure it’s depth = RD
My measurements;
WW= 3”
LW = 2”
WA = 4”
WTH = 2”
E = 1”
THT = 5”
Make tension swatch:
Measure stitches/inch (SI) and rows per inch (RI)
My yarn (grey Alpaca):
Spun 5.5:1 over 2” i.e. low twist single
Diam approx 11 WPI - prewash
Swatch (stocking stitch) : 8 stitches and 9 rows per inch on 3 ¼ mm straight needles
Method:
GeneraL:
Cast on 2 X WW X SI stitches
Slip first stitch throughout the work to leave loose edge stitches for sewing together later.
Work in 1 X 1 Rib for LW X RI rows
Another coloured yarn can be added mid-wrist (as in my specific pattern below)
Change to stocking stitch adding required number of stitches across first row (for a less
Sudden/sharp change of width at base of thumb, add stitches more gradually over following rows).
Number of stitches to add = (WA – WW) X SI
Continue in stocking stitch for WTA X RI rows
Cast off SI stitches at beginning and end of next (right side) row.
Purl next row as usual and continue in stocking stitch for (THT – RD) X RI rows
(If no end rib or other pattern, continue in Stocking Stitch for THT X RI rows and then cast off)
Continue in 1 X 1 rib for RD X RI rows then cast off
I changed to another coloured yarn for last 4 rows of stocking stitch section, just below end rib – but it could (and perhaps should ) be added anywhere in this section)
Pick up and knit the 16 cast off sts from thumb hole plus 2 on each side to make a continuous circle for the thumb tube. I used a crochet hool to pick uo 8 sts and transferred them to one double pointed 4 mm needle, then 6 sts and transferred to 2nd dpn, then 6 sts and transferred to 3rd dpn. I placed a marker in the stitch just under the first st on the first needle.
Knit 10 rows of 1X1 rib on the dpns and cast off.
My specific pattern instructions:
----------------------------------------------------
CO 48 sts using thumb method (and number of strands of yarn required to make chosen thickness of yarn
Slip all first stitches throughout
18 rows of 1X1 rib – add red –grey yarn at row 11, all red rows 12 and 13 , red-grey row 14.
1, 2, 3, 4, 5, 6, 7, 8, 9, 10, 11, 12, 13 (red added alternate stitch) = right side, keep cross-overs to back /wrong side), 14 (red), 15(red), 16, 17, 18
Next row – stocking stitch and* K3, Make 1 * repeat to end – (64 sts.)
Then cont to complete 18 rows of ss, ending on ws
1, 2, 3, 4, 5, 6, 7, 8, 9, 10 , 11, 12, 13, 14, 15, 16, 17, instead of doing line 18 as before, as I ended on ws and this glove is long enough, on 18 (rs), I CO 8 sts and on next line (19), CO 8 then purl to end. (48)
Cont SS for 8 rows in grey
1, 2, 3, 4, 5, 6, 7, 8.
Next row – knit alternating red and grey
Next row - purl in red
Next row, - knit in red
Next row - Purl alternating red and grey
K 1 row
P 1 row Done to here.
Next approx. 10 rows – 1X1 rib 1, 2, 3, 4,
Cast off
Bind/sew side seams aligning each side of thumbhole, top and bottom ribs.
Pick up and knit 16 cast-off stitches plus 4 sts on size 3/14 or 4 mm DPNs
10 rows of 1X1 rib (approx)
Cast off.
Weave in the ends.


